MobiFlight Community Support

Welcome to the forum for MobiFlight! Feel free to reach out to the community in case you have questions, issues or just want to share great ideas or details about your latest home cockpit project.

You like MobiFlight? Donate via PayPal and support the MobiFlight development. Thanks! 

05/03/2024 - This forum is read-only

The community support for MobiFlight has moved exclusively over to our Discord server. Register for free and enjoy more interactive functions like image and video upload, voice chat. More than 7,000 registered users around the world make it a great experience!

See you on our MobiFlight Community Discord server.

A HUGE Thank You to everyone who participated in the forum, especially obviously to Pizman and Stephan who did an outstanding job over so many years providing an incredible service to the MobiFlight community.

The forum is still providing a lot of good content, hence we keep this information accessible.

Avatar
VR-FlightSim
From: United Kingdom
Posts: 99
Supporter
Hey guys
This subject is directly related to our previous conversation but specifically focused on one particular example. Interfacing a Real Navigational Indicators.

As you probably know already I'm using all real parts and avionics in my build. Althought we have great support of servos and steppers in MF, I'm not a big fan of replacing the precision instrument guts with cheap jerky servos.

These are great when it comes to building the instrument from scratch but it adds many hours of unnecessary work where we already have precision little "movers" within the original unit.
It's also rather barbaric though, like buying expensive analogue amplifier and then replacing its lamps with transistors.

Well to get to my point, I've been researching the options and after some testing I wanted to share first results.

We are actualy able to drive Deviation Needle, From/To Flag and Nav Flag of the instrument, directly from Mobiboard.

These individual indicators are being moved about by little device called D'Arsonval Movement Meter.


Because these coils require very little power (40 - 150 mV) we can drive them with PWM via simple voltage divider.
Credit for this idea belongs to few folks at X Plane.org forum. They used it for the same purpose but drove the coils from arduino with custom script.
Now, since MF provides PWM to drive servos, and the code side is already sorted by Sebastian, all we need to do is hook it up via the mentioned voltage divider.

CDI Needle Schematics by Jay, on Flickr

The circuit consist of two micro trim potentiometers at 10Kohm and one 22K resistor.
First I coudn'l get this to work with the resistor in place. I thought there might be something going on in mobiboard's firmware. I assumed (correct me if I'm wrong) that it has something to do with the internal pull up resistor, so I took my 22K resistor out, and it worked like a charm:)

It's super easy to adjust range and center possition with the two pots and needle movement is nice and smooth.

Will post video when I get some time.

Jay
[Last edited by VR-FlightSim, 2019-12-22 02:27]
2019-11-26 11:42
Avatar
DocMoebiuz
Moderator
From: EDSH, Germany
Posts: 1516
That is really cool! I will try it with mine too
Have a great day!
Sebastian

MobiFlight - Simply build your own home cockpit for your favorite flight sim - MSFS2020, FSX, Prepar3D (FSUIPC), X-Plane (XPUIPC)
2019-11-26 14:03
Avatar
VR-FlightSim
From: United Kingdom
Posts: 99
Supporter
alright, here's the video I promised;)

VIDEO0037 by Jay, on Flickr


edit:
I also managed to set up photo gallery for the PA23-250 Aztec project.
Link below if anybody's interested:blink:
https://www.flickr.com/gp/185710385@N03/z75Gq2

Jay
[Last edited by VR-FlightSim, 2019-12-04 22:09]
2019-12-04 21:33
Avatar
DocMoebiuz
Moderator
From: EDSH, Germany
Posts: 1516
I love it! I have a similar bendix VOR with GS. I definitely would love to interface this in the way you did.
Have a great day!
Sebastian

MobiFlight - Simply build your own home cockpit for your favorite flight sim - MSFS2020, FSX, Prepar3D (FSUIPC), X-Plane (XPUIPC)
2019-12-05 01:19
Avatar
aeromax
Posts: 252
Supporter
Hi :)

that sounds very good and looks great! done perfectly.
so I guess you connected this via a brake out module blw.

Electronics-Salon Schraubklemmenblock Breakout-Modul, für Arduino MEGA-2560 R3, around 37€.

The vid is very cool, but just one question, is it possible to turn the knob at the gauge directly and manually?

I like to build and use that for mine orig. KING KI205 VOR/LOC.

Should I know something specifically about this? Because it is a little bit different to your‘s

That’s great!

Thx
Best regards
Max
Life is Good When You Find What You are Looking For!
2019-12-14 19:45
Avatar
VR-FlightSim
From: United Kingdom
Posts: 99
Supporter
Hi Max
The breakout module is not necessary, I just got a good deal on a few so I bought them to simplify and secure the connection.

Controlling the compass card manually is unfortunately not possible with Mobiflight. So far, we have no means of reading precisely its position over the 360 degrees range.
I'm trying to steer Sebastian's attention towards "magnetic hall effect encoder" which would open a whole new world of possibilities in MF, but I guess he's just too busy nowadays.

The only option, for now, is to "dissect" the instrument, disconnect the gears (OBS knob <> compass card) and install conventional encoder to the knob and stepper motor to the card.
I'm not overly excited to go that way as we might as well replace the D'arsonval coils with servos at the same time and call it a wrap.
Plus we'll lose all the instruments original character though.

Regarding your KI-205 VOR / LOC Indicator
First, you want to find a few basic facts. Quick google search for Ki250 installation manual reveals the back connector pinout as follows:
pin 5 ... +TO
pin 8 ... +FROM
pin 10 ... +Right Deflection
pin 2 ... +Left Deflection
Then you have int lighting, common ground, and resolver/potentiometer pins but that's not important for now.

There are two types of indicators (as far as I know).
One, where the D'arsonval coil of the needle is connected directly to the back connector (like in your case +L, +R) and is driven by the radio receiver itself.
Second, where there is an internal circuit/ driver for the coil inside the enclosure receiving a specific signal/tone through the back connector.

With the first example, we can use the back connector for the control.
The second requires to connect onto the needle coil directly.

You'll also want to know a working voltage range and impedance for both of your coils for your reference.

I hope you got the answer you were looking for.
Good luck with the project.
If anything, we're here to help each other out ;)

Jay
2019-12-16 23:58
Avatar
aeromax
Posts: 252
Supporter
Thanks for that. Appreciate it.

Big event....
Life is Good When You Find What You are Looking For!
2019-12-21 10:06
Avatar
aeromax
Posts: 252
Supporter
Just one question,

to connect the TO/FROM Flag is that the same way like the CDI?? :rolleyes:

Because it should be the same mV and smooth moving like in real condition.

That KI205 contains a Poti with 4 cables, 3,6,9,12
brown/red/orange/yellow with a connecting rod (gear pair) to OBS knob.

CDI & Flag is separate.
Life is Good When You Find What You are Looking For!
2019-12-21 19:04
Avatar
VR-FlightSim
From: United Kingdom
Posts: 99
Supporter
The flags work simply with two LED outputs per flag. The trick is to set up one pin high and one low at the time or both low for OFF state.

From/To Flag Schematics by Jay, on Flickr
I will post a nice little demo idea for the OBS bug at some point this holiday, so stay tuned;)
Jay
2019-12-22 02:36
Avatar
aeromax
Posts: 252
Supporter
Hi Jay

thx, thats awesome. the ordered goods, resistors, potis are on the way because I didn’t have any more.

if that works later on, also i gonna publish few shots.

I looked at your page, very cool!

five by five
stay tuned & thanks

Max :)
Life is Good When You Find What You are Looking For!
2019-12-22 09:23
Avatar
aeromax
Posts: 252
Supporter
Life is Good When You Find What You are Looking For!
2019-12-22 10:25
Avatar
VR-FlightSim
From: United Kingdom
Posts: 99
Supporter
Hey guys, hope you all had a great Xmas...
I wanted to share a little "proof of concept" with Sebastian and other MobiFlight developers.
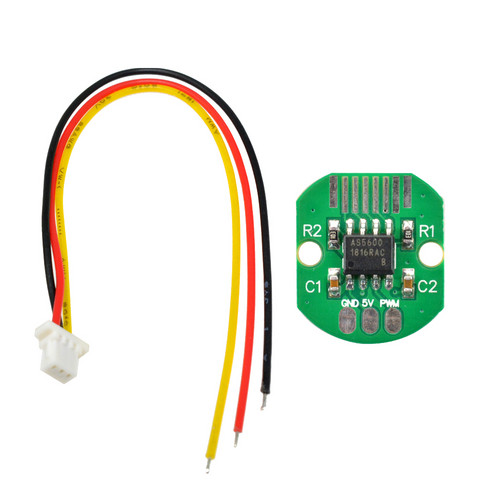
You all heard me mumbling about the magnetic encoders for awhile here. The truth is, I was just so curious about this little tech, that I couldn't resist and ordered an AS5600 Evaluation Kit from AMS.

Although I have literally no programming skills, this kit comes with everything you need to connect the encoder via USB/I&P Box to your pc and run simple lab software to evaluate the results.
I was just really curious how this little gadget performs in terms of accuracy, repeatability and obviously ease of use.. As I mentioned earlier I've seen this particular magnetic encoder being used by pro builders and by now, I'm so convinced that its native support in MF would make the priceless asset.
The AS5600 is the later model (from previously promoted AS5040) with 12-bit resolution and even an optional analogue output (PWM out as default). We can buy these sensors for as little as £2.75 including breakout board, magnet and postage (just put AS5600 in eBay search).

The kit I purchased was significantly more expensive but it is based on the same chip/sensor and it allows people like me to quickly see the test results without too much hassleB)
Now for the tricky part, the one on a picture above only connects via three pins (+5V, GND, PWM) so I assume that if we can understand what's happening "under the hood" we could theoretically read the PWM signal with MF and then use the resulting numbers as we like (compass card position, trim wheel, rotary switch, flaps, whatever).

Well, they say a picture is worth thousand words so let me finally get to the point:w00t:
I printed little plastic bracket with a flange in a shape of the original resolver so I could fit the sensor back into the instrument. The rest is self-explanatory I hope...

2019-12-26_11-15-17 by Jay, on Flickr

2019-12-26_11-16-09 by Jay, on Flickr

2019-12-26_11-16-33 by Jay, on Flickr

2019-12-26_11-16-58 by Jay, on Flickr


And now ladies and gentleman... short video showing the test resultsB)

AS5600 by Jay, on Flickr


@ Sebastian & the gang..
There is a ton of documentation and an actual Arduino script for AS5600. I can post all the links I have saved from my research on this.
Also, I'm willing to send you my complete Evaluation Kit plus one of the cheap eBay sensors as well, if you're interested to do some testing yourself...;)


Over & out
Jay
[Last edited by VR-FlightSim, 2019-12-29 10:51]
2019-12-27 01:00
Avatar
aeromax
Posts: 252
Supporter
Awesome!!! :)

Great idea! Like to check that AS5600 to trim OBS. Also it’s much more easier to print the own e.g. gear-boxes an other things.

Jay, ...just for understanding the right way, the immediate connection to the VOR needle/coil should be on both sides (limiter & center) Pin2(+) and Pin10(+), I guess?!

For any documentation, would be nice to:
forecast(AT)public-files.de

Just have completed one orig ASI from ex Northwest Fleet. Runs very well.

Max :)
Life is Good When You Find What You are Looking For!
2019-12-28 00:38
Avatar
VR-FlightSim
From: United Kingdom
Posts: 99
Supporter
Thanks, I just hope that the "boss" will find it equally exciting:D

Regarding your indicator
Yes, you're correct. According to the installation manual, I found online, pins 2 and 10 are the immediate CDI coil connection.

I saw your Flickr too btw. Well done mate, nice work. Did you use stepper/servo or the original coil?

Regards
Jay
2019-12-29 11:05
Avatar
aeromax
Posts: 252
Supporter
Hi, thankYou,

indeed i tried to use the orig coil but it was too tricky. Too much obscurity :) so I‘m using a Stepper and he works great. Orig 737 Flap Indic also. ASI still working fine. But most of the orig. Stepper are operated with 26-28V but 400Hz, I guess then we need a special converter to drive those. 2 EGT instr. with rebuild but orig elec.

Stay tuned
Thx
Max
Life is Good When You Find What You are Looking For!
2019-12-29 11:33